Posts tonen met het label Els Brigé. Alle posts tonen

donderdag 24 november 2022

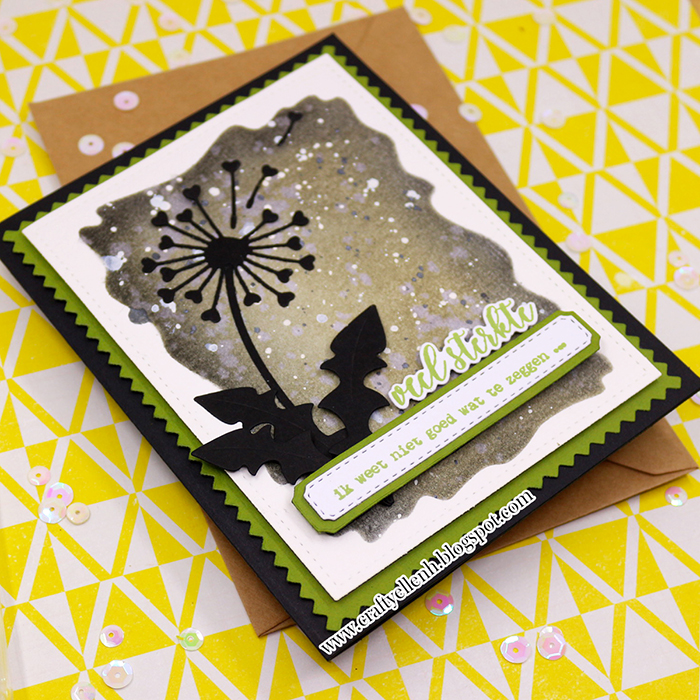
Sympathy and strength


Hello everyone, today I Want to share a card with you I made for a colleague.                       * Hallo allemaal, vandaag wil ik een kaart met jullie delen dat ik voor een collega heb gemaakt.


Inspired by Helga's card, I set to work to convey a loving message for a decedent                       * Geinspireerd door het kaartje van Helga ging ik aan de slag om een liefdevolle boodschap over te brengen voor een overleiden.


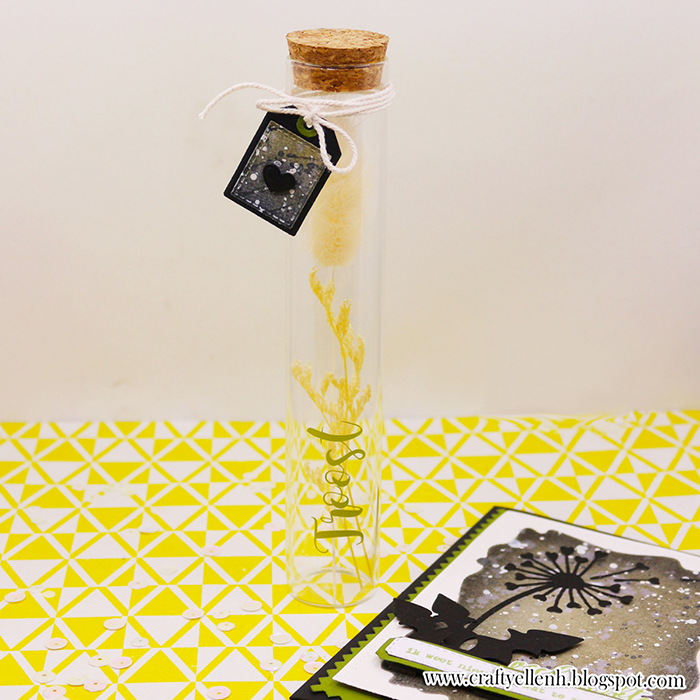
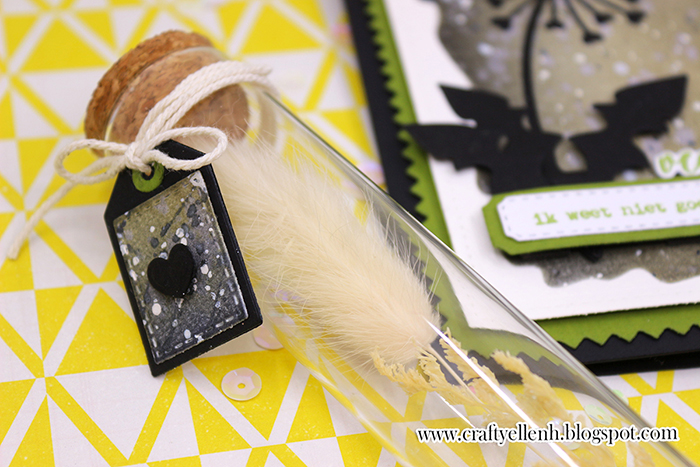
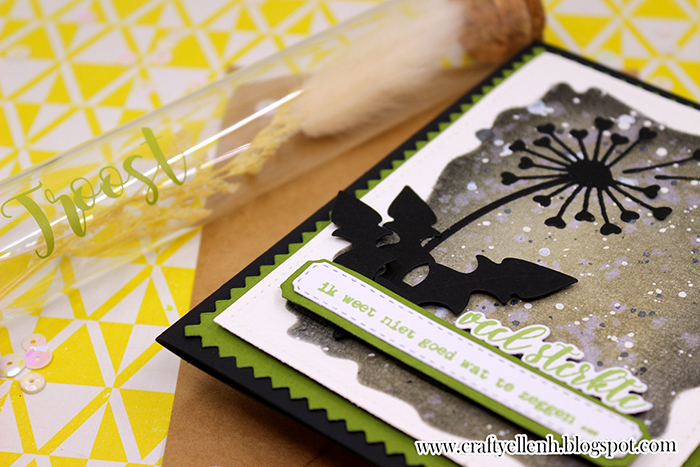
I also really liked being able to use my cricut for the tube. I taped the word 'Troost' (= sympathy) to the tube with vinyl and made a mini tag at the top.                       * Ik vond het ook erg leuk om mijn cricut aanvullend te kunnen gebruiken voor het buisje. Ik plakte met Vinyl het woord troost op het buisje en maakte een mini-tag bovenaan.


Hopefully I can give you inspiration, when needed. I think handmade items are super powerful on those moments people need it the most.                       * Hopelijk kan ik jullie hiermee inspiratie geven, wanneer nodig. Want handgemaakte items zijn zo krachtig op momenten dat mensen het het meest nodig hebben.

woensdag 1 april 2020

Thank You

Hello everyone, welcome to my blog! Hopefully you are healthy and I can bring positive vibes  to you with this blog post.                * Hallo iedereen, welkom op mijn blog! Hopelijk zijn jullie gezond en kan met deze blogpost een positieve nood brengen. 


First I colored the illustrations with Zig Markers (watercolor markers). The stamps are from Heffy Doodles. I also cut out some shapes with Lawn Fawn dies. Last but not least I added the text. Both stamp and dies used for the text are made with some Els Brigé products.                * Allereerst kleurde ik de illustraties in met Zig Markers (waterverf stiften). De stempels komen van Heffy Doodles. Verder sneed ik enkele vormen uit met Lawn Fawn snijmallen. Allerlaatste voegde ik de tekst toe. Zowel stempel als snijmal die gebruikt werden voor de tekst, is gemaakt met enkele Els Brigé producten.


Deze kaart was gemaakt voor een vrijwilliger die ons hielp op ons werk. Vandaag moeten we enkele vrijwilligers van hen missen, maar hopelijk waren ze wel blij met het kaartje.                * This card was made for a volunteer who helped us in our work. Today we have to miss some of the volunteers, but hopefully they were happy with a card.


maandag 26 augustus 2019

Creative Insights

Welcome to another Monday blog post. I hope you enjoyed the weekend! I did spend a little bit time in my craft room. Below you can see a card I made for someone who recently had some health issues. Someone asked me to make a card for her.                     * Welkom op een nieuw maandag-blogbericht. Ik hoop dat je genoten hebt van je weekend! Ik bracht wel wat tijd door in mijn knutselruimte. Hieronder zie je een kaart die ik heb gemaakt voor iemand die recent gezondheidsproblemen heeft. Iemand vroeg me om een ​​kaart voor haar te maken.


Here I like to share a few little tips how I come up with a card like this. First of all I make the person that demanded choose the text. That person knows the recipient the best. She/him can better tell what fit the person the best. Then I picked flower illustrations. Florals are neutral and are therefore nice on a card like this. As last step I think about the color scheme and the card design. If I send positive out I want to mimic that in my colors. That’s why you can see the vibrant colors on my card. For this card the card design came out the background panel. There is a hole in the panel in the shape of the circle. That hole I covered with an other circkle.                     * Hier deel ik graag een paar kleine tips over het denkproces van mijn kaart. Allereerst laat ik de persoon die de kaart aanvroeg de tekst voor mijn kaart kiezen. Die kent de ontvanger het beste. Zo kan ze iets kiezen dat beter bij de persoon past. Vervolgens koos ik bloemillustraties. Bloemen zijn neutraal en staan ​​daarom mooi op een kaart als deze. Als laatste stap denk ik aan het kleurenschema en het kaartontwerp. Als ik iets positief wil sturen, wil ik dat in mijn kleuren nabootsen. Daarom zie je levendige kleuren op mijn kaart. Voor deze kaart kwam het kaartontwerp uit het achtergrondpaneel. Er zit namelijk gat in de vorm van een cirkel op het paneel en ik bedekte dit met een andere cirkel.


That’s how this card came to life. I hope you enjoyed the thoughts behind the creating. Enjoy the rest of your day!                     * Ziezo dat is hoe deze kaart tot leven kwam. Ik hoop dat je de gedachten achter het creëren interessant vond. Veel plezier nog vandaag!


maandag 29 juli 2019

Special Sympathy Card

Hello everyone, in this post I share a sympathy card that I made last week.               * Hallo allemaal, in dit bericht deel ik een rouwkaartje dat ik vorige week maakte.


I just started a new job and someone I just met passed away unexpectedly a few days later.
She died of a stupid accident. Because she was so full of life and my colleagues knew her well, I really wanted to contribute to their loss by making a card.               * Ik ben net  een nieuwe job begonnen en iemand die ik net heb ontmoet overleed aan een stom accident. Omdat ze nog zo vol leven was en mijn collega's ze goed kende wilde ik natuurlijk heel graag een steentje bij dragen aan hun verlies door een kaartje te maken.


Because it was so unexpected, I wanted to offer future prospects through the card. That is why I decided that the flowers (a stamp set from Els Brigé) should be light blue instead of gray. I also found the message fitting to help people in the processing process (it says to stay strong and give love). The placements of all elements were based on a card that I already made in the past; find here the blog post.                * Omdat het zo onverwacht was, wilde ik toekomstperspectief bieden via het kaartje. Daarom besloot ik de bloemen (de stempel set is van Els Brigé) licht blauw in plaats van grauw kleuren. Verder vond ik de boodschap ook erg passen om mensen te helpen in het verwerkingsproces. De plaatsing van alle elementen waren gebaseerd op enkele kaartjes die ik al eens maakte; vind hier de blogpost.


Thanks for visiting me today, I will see you again very soon!                * Bedankt om me vandaag een bezoekje te brengen, ik zie je snel weer!

vrijdag 31 mei 2019

Happy Hellebore

Welcome back to my blog! As you know I was for a long time part of the Els Brigé Design design team, but I left the team a few months ago. Afterwards they came out with a few new sets and I loved buying some of them. The one I loved the most was this "Helleborus" stamp and dies set. Now that I bought them, it was time to use the stamps!                     * Welkom terug op mijn blog! Zoals je waarschijnlijk weet, maakte ik een lange tijd deel uit van het designteam van Els Brigé Design, maar ik verliet het team een ​​paar maanden geleden. Daarna kwamen er een paar nieuwe sets uit die ik leuk vond om te kopen. Het meest hield ik van deze "Helleborus" stempel en stans set. Nu ik ze kocht was het ook eens tijd om de stempels te gebruiken!


These flower illustrations where colored with Zig Clean Color Real Brush markers. In the beginning I thought to make a Sympathy card and choose purple and blue colors to go with that theme. In the end I used marker colors from below:                      * Deze bloemillustraties zijn gekleurd met Zig Clean Color Real Brush stiften. In het begin dacht ik een rauw-kaartje te maken. Ik koos dan ook paarse en blauwe kleuren die bij dat thema paste. Uiteindelijk gebruikte ik onderstaande kleuren:

Purple/Paars: No.030 Blue, No.080 Violet, No.081 Light Violet
Orange/Ornaje: No.023 Scarled Red, No.052 Bright Yellow
Green/Groen: No.043 Olive Green, No.046 Mid Green, N0.045 Pale Green


The colors came out much brighter than I thought, but I really loved the results. That's why I changed the theme to something happier. It will be a card to wish my neighbors good luck on some happy new they recently shared; getting engaged! To make the card perfect for that I choose some colors that brought a lot more happiness on the card (teal and pink). To make the flowers stand out, my background had to be present, but don't have too much glamour. That's why I kept it simple and created it with gray paper, a stencil with a small pattern and the Picket Fence Distress Ink.                     * De kleuren kwamen veel helderder uit dan ik had verwacht, maar ik hield echt van het resultaat. Daarom veranderde ik het thema in iets gelukkiger. Het zal een kaart zijn om mijn buren veel succes te wensen met een gelukkig nieuws dat ze onlangs hebben gedeeld; ze zijn verloofd! Om de kaart perfect te laten passen, heb ik een aantal kleuren gekozen die voor veel meer geluk uitstraalden op de kaart (blauwgroen en roze). Om de bloemen te laten opvallen, moest mijn achtergrond aanwezig zijn maar niet te veel op de voorgrond komen. Ik koos dus voor een eenvoudige achtergornd gemaakt met grijs papier, een sjabloon met een klein patroon en de Picket Fence Distress Ink.


The most work was in the coloring of the flowers, but I really love how the card turned out! The completed card is just stunning.                     * Het meeste werk  zat in het kleuren van de bloemen, maar ik ben echt dol op hoe de kaart er uiteindelijk uitziet! De volledige kaart is gewoon verbluffend.


PS. Recently I have a lot more followers on my Instagram Page! To thank all of you I have a little giveaway box ready to be send out to a lucky winner. Be sure to check my Instagram page if you want to make a chance on that giveaway (it ends this Sunday - 2 June 2019).                      * PS. Onlangs heb ik veel meer volgers op mijn Instagram-pagina! Om jullie allemaal te bedanken, heb ik een klein pakket klaar om naar een gelukkige winnaar te verzenden. Zorg er dus voor dat je mijn Instagram-pagina checkt als je een kans wilt maken op die doos (het eindigt deze zondag - 2 juni 2019).

vrijdag 1 maart 2019

Yes, We Get Married!

Hello! Today is a special blog post for a few reasons. As most of you know I was in the Els Brigé Design team from the start of this team, but unfortunately this will be my last blog post as a member of the design team. Because I loved this team so much, I want to finish with something else that is close to my heart.                 * Hallo! Vandaag is een bijzondere blogpost op verschillende vlakken. Zoals de meesten onder jullie weten was ik in het Els Brigé Design team vanaf de start van dit team, maar helaas zal dit voorlopig mijn laatste blog post zijn als lid van het design team. Omdat ik zoveel van dit team hield wil ik wel afsluiten met iets anders dat nauw aan mijn hart ligt.

What you see here is a card that I made for my fiancé. We marry very soon and I really wanted to give him something meaningful before he sees me completely dressed up. It’s a card to reassure him and to tell something sweet.                 * Wat jullie zien is namelijk een kaartje dat ik gemaakt heb voor mijn verloofde. Wij trouwen heel binnenkort en ik vond het leuk om hem iets betekenisvol te geven vóór dat hij me helemaal opgemaakt ziet. Het dient ervoor om hem even gerust te stellen en iets liefs te vertellen.


For this I bought paper with matching envelope that has a pearl blue color / appearance. For the project I went looking in different sets that fit together. In this post I want to show that you can be quite creative if you use different sets of Els Brigé Design.                 * Hiervoor kocht ik papier en een passende enveloppe hebben een parelblauwe kleur/schijn. Voor het projectje ging ik op zoek in verschillende sets die bij elkaar passen. In deze post wil ik dan ook tonen dat je best wel creatief kan zijn als je verschillende sets gebruikt van Els Brigé Design.


First of all, I stamped the front of the envelope with silver embossing powder with the words "JA’ (=’Yes’) and ‘We Trouwen (="We Marry") from the “Meneer en Mevrouw” stamp set. On the inside of the envelope I stamped ‘Succes voor strakjes’ (= ‘succes for later’) from the "Pink Ribbon" stamp set. I find it super nice that this stamp suddenly gives a very different feeling than what it is meant to be. Searching from time to time in stamp sets where you don’t think you can find anything can turn out unexpectetly perfect!                 * Allereerst stempelde de voorkant van de enveloppe met zilveren embossingpoeder de woorden ‘Ja’ en ‘Wij Trouwen’ van de “Meneer en Mevrouw” stempelset. Aan de binnenkant van de enveloppe stempelde ik “Succes voor strakjes” van de “Pink Ribbon” stempel set. Ik vind het super fijn dat deze stempel plots een heel ander gevoel geeft dan waar die het meest voor bedoeld is. Dus af en toe zoeken in stempels sets waar je denkt niets in te vinden kan onverwacht leuk uitdraaien!


Then I searched for a nice sketch that I could use to create the card. When I cut out all my desired shapes, I stamped the rest of the texts. I knew that I wanted to stamp the word ‘huwelijk’ (= ‘Marriage’ from the "Mr. and Mrs." stamp set) in my heart with white embossing powder. The word Marriage on own I found a bit empty. The word ‘dat’ (= ‘That) from a sentence from the "Bedankt" set fits perfec. Carefully cut your stamps in two or cover them with Post It Notes is also very useful if you combine text; That is also what I did here with that word ‘dat'. Lastly, I found a very encouraging text ('#Helemaalklaarvoor’ = ready for it from the “Hier & nu” stamp set) that did fit perfectly to complement the card.                 * Vervolgens zocht ik een leuke schets die ik kon gebruiken om de kaart vorm te geven. Toen ik al mijn gewenste vormpjes uitsneed stempelde ik de rest van de teksten. Ik wist dat ik het woord Huwelijk (van de “Meneer en Mevrouw” stempelset) in mijn hartje wilde stempelen met wit embossing poeder. Het woord ‘Huwelijk’ op zichzelf vond ik iets ontbreken. Het woord ‘Dat’ van een zinnetje vanuit de “Bedankt” set paste als gegoten. Je stempels voorzichtig in twee knippen of afdekken met Post It Notes is ook heel handig als je tekst combineerd; Ook dat deed ik hier met die ‘dat’. Als laatst vond ik een super bemoedigend tekst (‘#helemaalkaarvoor’ van de “Hier & nu” stempelset) die prima paste om het kaartje aan te vullen.


Using stamps together in this way becomes a fun grammatical game. Hopefully you enjoyed my last blog post. I already had a lot of pleasure to make you part of something more personal in my life. Hopefully I will se you soon; I will definitely keep inspecting the Els Brigé blog!                 * Stempels samen gebruiken word op die manier een leuk grammaticaal spelletje. Hopelijk genoten jullie van mijn laatste blog berichtje. Ik had alvast veel plezier om jullie een beetje deel te laten uitmaken van iets persoonlijker in mijn leven. Hopelijk tot nog eens, ik zal de Els Brigé blog zeker blijven inspecteren!

https://www.elsbrige.com/shop/bedankt-stempelset/?v=d3dcf429c679 https://www.elsbrige.com/shop/mijnheer-mevrouw-stempelset/?v=d3dcf429c679 https://www.elsbrige.com/shop/hier-nu-stempelset/?v=d3dcf429c679 https://www.elsbrige.com/shop/pink-ribbon-stempelset/?v=d3dcf429c679

maandag 18 februari 2019

The Two Of Us

Hi crafty friends, today I will show inspiration for the valentines theme-week from Els Brigé. For valentine we need a little more than just a card of course. That's why you can see some treats and coordinating card below.                 * Hallo creatieve vrienden, vandaag toon ik inspiratie van de Valentijns themaweek van Els Brigé. Voor valentijn hebben we natuurlijk iets meer nodig dan alleen een kaart. Daarom kan u hieronder wat lekkernijen en een passend kaartje zien.


For the inspiration week I started looking for an other color combination than the typical color red. I love the website "seeds" for this. Using a color website broadens your color combinations. For me it helps me to not always stick with the same colors.                 * Voor de inspiratieweek ben ik op zoek gegaan naar een alternatieve kleurencombinatie. Ik hou van de website "seeds" hiervoor. Het gebruik van een kleurenwebsite verbreedt uw kleurencombinaties. Voor mij helpt het me om niet altijd met dezelfde kleuren te blijven werken.


After I choose the color combination I started looking for the stamps. I knew immideately I wanted to use 'ik hou van jou' (= I love you in Dutch) from the "Jij en Ik" stamp set for the tag.                 * Nadat ik de kleurencombinatie had gekozen, ging ik op zoek naar de stempels. Ik wist meteen dat ik 'ik hou van jou' wilde gebruiken van de "Jij en Ik" stempel voor de tag


For the sentiment on the card I looked for similar font. I think it's so fun that a lot of the stamps can be combined with eachother so they are a perfect match. To give the card dimension I plased the pannel and the little sentiment stroke on 3D foam.                 * Voor de boodschap op de kaart zocht ik naar hetzelfde lettertype. Ik vind het zo fijn dat veel van de stempels een perfecte match zijn. Om de kaartdimensie te geven, plaatste ik het paneel en eveneens een kleine strook op 3D-schuim.


The smallest heart form the "knuffelkonijn" die set was perfect as finishing touch on both projects.                 * De kleinste hartjes stansz van de 'knuffelkonijn' set was perfect als een finishing touch op beide projecten.


That's it for today. I hope you enjoyed my project. Enjoy your stamping!!                 * Dat is het voor vandaag. Hopelijk genoot je van mijn project. Verder wens ik jullie veel stempelplezier!!

maandag 4 februari 2019

Black and… craft

Hi everyone! Here I'm again and I'm happy to share a card that is a little atypical for my normal style of cardmaking. Today I show a very simple card design that features the “Superpapa” and “T’is je Verjaardag” stamp sets from Els Brigé.                 * Hallo iedereen! Hier ben ik weer en ik ben blij een kaart te delen die een beetje afwijkt van mijn gewoonlijke kaartstijl. Vandaag heb ik een heel eenvoudig kaartontwerp met de 'Superpapa' en 'T'is je Verjaardag' stempel sets van Els Brigé.


Normally I make cards with a lot of layers and coloring, but sometimes it’s so much fun to step out that confort zone. For this one I just stamped the face with black ink on my center piece and popped the piece up with 3d foam. After that I did put the birthday wish at the bottom of the card.                 * Normaal maak ik kaarten met veel lagen en kleuren, maar soms is het leuk om uit die confort-zone te stappen. Voor deze heb ik gewoon de gezichten met zwarte inkt op mijn middenstuk gestempeld en heb ik het stuk met 3d foam op de kaart geplakt. Daarna heb ik de verjaardagswens onderaan de kaart geplaatst.


To make it still look festive I used black and silver twine at the top of the card.                 * Om het er nog steeds feestelijk te laten uitzien, gebruikte ik zwart en zilver touw bovenaan de kaart.


The envelope had another manly face on it, and that’s it for today.                 * De envelop kreeg een ander mannelijk gezicht en dat is het dan al voor vandaag.


https://www.elsbrige.com/shop/superpapa-stempelset/?v=d3dcf429c679 https://www.elsbrige.com/shop/t-is-je-verjaardag/?v=d3dcf429c679

maandag 21 januari 2019

A Colorful Thank You

Hi everyone! I'm here with a new blog post for you made with Els Brigé Design products. In this post I will not only show two variations on a card, but also make the watercolor background.                 * Hallo iedereen! Ik ben hier weer met een nieuwe blogpost voor jullie gemaakt met enkele Els Brigé Design productjes. In deze post zal ik niet alleen twee variaties tonen van een kaart, maar ook je de de waterverf achtergrondjes maakt.


I need more thank you cards and I soon found a nice layout that was easy to imitate. Of course I started with the watercolor background. Here is a step-by-step of how I got it:                 * Ik heb meerde dankjewel kaartjes nodig en bedacht al snel een leuke layout die gemakkelijk was na te bootsen. Natuurlijk begon ik met de waterverf achtergrond. Hieronder vind je stap voor stap een uitleg:

1. In order to obtain the effect, you must cover the paper with water. I used a 'Foam Brush' for it, but you can use a normal paintbrush too. You may be generous with the water. You can also tape your paper down if you do not want it to curl.                 * 1. Om het effect te bekomen dien je eerst het papier met water te bedekken. Ik gebruikte hiervoor een ‘Foam Brush’, maar je mag ook een gewoon penseel gebruiken. Je mag best gul zijn met het water. Je kan eventueel ook je papier vasttapen als je niet wil dat het gaat krullen.

2. Than you take your paintbrush and dip watercolor on the paper. The water will then spread the paint. You can apply different colors in different places. You have also time to add more color in certain places.                 * 2. Vervolgens neem je een penseel en dip je je gekozen waterverf-kleur op het papier. Het water zal vervolgens je kleur verspreiden. Je kan andere kleuren op verschillende plaatsen aanbrengen. Je hebt ook tijd om meer kleur toevoegen op bepaalde plekken.


3. Let the water do his work and the results will be fabulous.                 * 3. Laat vooral het water zijn werk doen, het resultaat is adembenement.


When the paper dried I positioned the message on my card. For this I used the Dankjewel' dies and stamp set. I also placed in a diagonal a few hearts from the "knuffelkonijn" stamp and die set.                 * Wanneer het papier droog was, positioneerde ik de boodschap op mijn kaartje. Hiervoor gebruikte ik de ‘bedankt’ snijmal en stempelset. Daarnaast plaatste ik in een diagonaal enkele hartjes van de “knuffelkonijn” stempel en stansset.


With the blue card I did the same thing.                 * Met het blauwe kaartje ging ik helemaal hetzelfde te werk. 


For me it was the first time that I used watercolorS in this way. I really enjoyed the effect!                 * Voor mij was het de eerste keer dat ik waterverf op deze manier gebruikte. Ik vind het effect echt super mooi gelukt.


I really had fun putting these cards together; they were pretty easy to create too! I hope you enjoyed reading this post as much as I did with creating these cards!                 * Ik heb echt heel veel plezier gehad met het samenstellen van deze kaarten; ze waren ook vrij eenvoudig te maken! Ik hoop dat je van deze net zoveel plezier aan beleeft als ik met het maken ervan! 


https://www.elsbrige.com/shop/knuffelkonijn-stempelset/?v=d3dcf429c679 https://www.elsbrige.com/shop/knuffelkonijn-coordinerende-stansset/?v=d3dcf429c679 https://www.elsbrige.com/shop/bedankt-stempelset/?v=d3dcf429c679 https://www.elsbrige.com/shop/bedankt-woordstans/?v=d3dcf429c679