Posts tonen met het label Tips & Tricks. Alle posts tonen

woensdag 12 juni 2024

Tips for Using Infusible Ink on Wood

Have you ever tried using Cricut Infusible Ink on wood? Well, I will show you how you can do that.                        * Heb je ooit geprobeerd om Cricut Infusible Ink op hout aan te brengen? Wel, vandaag laat ik je zien hoe je dat kan doen. 

Today, I’m using the ‘Take Me to the Ocean’ SVG File from  Printable Cuttable Creatables and Infusible Ink Transfer Sheets.                        *In deze post gebruik ik de 'Take Me to the Ocean' SVG file van  Printable Cuttable Creatables en Infusible Ink Transfer Sheets.

After you’re happy with the size of your design and the color –  load the sheet on a mat (color side up). It’s important to click the 'Mirror' slider on each mat (especially when using text). DO NOT skip this step, or your text will read backward. When you’re ready, load the mat into the machine and cut out the illustration.                        * Nadat je tevreden bent met het formaat van het ontwerp en de kleur, plaatst je het vel op de snijmat (kleurzijde naar boven). Het is belangrijk om op elke mat op de schuifregelaar 'Spiegelen' te klikken (zeker als je tekst gebruikt). Sla deze stap NIET over, anders zal je tekst achterstevoren staan. Wanneer je klaar bent, laadt je de mat in de machine en snijd deze de afbeelding uit.

Be careful not to touch the Infusible Ink Transfer Sheets too much while weeding with your hand this can remove the ink from the sheets.                        * Zorg ervoor dat je de Infusible Ink Transfer Sheets niet te veel aanraakt tijdens 'weeding' van de illustratie. Hierdoor kan de inkt van de vellen vervagen!

Preheat your heat source, I’m using an EasyPress (see the manual of your heat press for the recommended heat and time). Use butcher paper to protect your heat source from the infusible ink. The heat can also cause the ink to end up on your heat source! So use butcher paper! NOTE: Do not move your heat source after you’ve placed it on top of the wood.                        * Verwarm je warmtebron voor, ik gebruik een EasyPress (zie de handleiding van je hittepers voor de aanbevolen hitte en tijd). Gebruik bakpapier om je warmtebron te beschermen tegen de inkt. Ook kan de hitte ervoor zorgen dat de inkt op je warmtebron terecht komt! Gebruik dus bakpapier! OPMERKING: Verplaats je warmtebron niet nadat je deze op het hout hebt geplaatst.

Once completed remove the butcher paper. Let the wood cool for 1-2 minutes before peeling the backing, and now you’re all set!                        * Als je klaar bent, verwijdert je het bakpapier. Laat het hout 1-2 minuten afkoelen voordat je het inktpapier verwijdert, en nu ben je helemaal klaar!

Comment below or on our Facebook group if you have any questions.                        * Reageer hieronder of in onze Facebookgroep als je vragen hebt. 

Happy crafting!                        * Veel plezier met knutselen!


I also received an Affiliate Link. This means that PCC rewards me for orders that you place on their website. It costs you nothing extra, but it does give me a nice advantage. You help me a lot if you place an order true this link: www.printablecuttablecreatables.com/?pcc=11. In return I have a nice discount code for you: 'craftyellen15'. This gives you a 15% discount during the entire design team period!                       * Ik heb ook een affiliate-link ontvangen. Dit betekent dat PCC mij beloont voor bestellingen die u op hun website plaatst. Het kost jou niets extra, maar levert mij wel een mooi voordeel op. Je helpt mij enorm als je een bestelling plaatst via deze link: www.printablecuttablecreatables.com/?pcc=11. Als tegenprestatie heb ik een leuke kortingscode voor je: 'craftyellen15'. Hiermee krijg je gedurende de gehele ontwerpteamperiode 15% korting!

donderdag 25 april 2024

Sweet Baby Banner Gift Idea


Hello and welcome to my blog again. Today I'm sharing this sweet baby banner gift I made using the: “Pretty Birdhouse SVG”,  “Mama & Baby Bird in Nest SVG”, “Sweet Baby Safety Pins SVG” and the hearts from “Cloud Raining Hearts SVG” from the PCC Shop.                       * Hallo en opnieuw welkom op mijn blog. Vandaag deel ik dit lieve babybannercadeautje dat ik heb gemaakt met de: "Pretty Birdhouse SVG", "Mama & Baby Bird in Nest SVG", "Sweet Baby Safety Pins SVG" en de hartjes uit "Cloud Raining Hearts SVG" van de PCC-winkel.


First of all I made my garland with HTV and my cutting machine. I combined the flowers of the birdhouses with the text and added a little heart here and there.                       * Allereerst heb ik mijn slinger gemaakt met flex en mijn snijmachine. De bloemen van de vogelhuisjes heb ik gecombineerd met de tekst en hier en daar een hartje toegevoegd.


Because there was also a bird on the baby card of Mia, these could of course not be missed on my flags. The eyes are the core of the flowers (cut out in a black color). My drawing was too fine to cut out the eyes as originally intended.                       * Omdat er op de babykaart van Mia ook een vogel stond, konden deze uiteraard niet ontbreken op mijn vlaggetjes. De ogen vormen de kern van de bloemen (uitgesneden in een zwarte kleur). Mijn tekening was te fijn om de ogen uit te snijden zoals oorspronkelijk bedoeld.


Do you know Canva? It is a website with which you can create professional posters, documents, Instagram posts and much more. PCC also provides png photos in the SVG sets. Ideal for making beautiful cards to add to your projects for sure with the help of this website.                       * Ken jij Canva? Het is een website waarmee je professionele posters, documenten, Instagram-posts en nog veel meer kunt maken. PCC biedt ook png-foto's in de SVG-sets. Ideaal om mooie kaarten te maken die je zeker aan je projecten kunt toevoegen met behulp van deze website.


I also made a note with washing instructions and ideas for what you can use the banner for. You can’t read it because it is of course in Dutch (my native language). But this project shows that you can also use the pretty PCC illustrations for much more than you think at first glance!                       * Ook heb ik een briefje gemaakt met wasinstructies en ideeën waar je de banner voor kunt gebruiken. Dit project laat zien dat je de mooie PCC-illustraties ook voor veel meer kunt gebruiken dan je op het eerste gezicht denkt!


Hopefully you find this blog post super inspiring. I am really happy with the result of this sweet baby banner gift ideas!                       * Hopelijk vind je deze blogpost super inspirerend. Ik ben erg blij met het resultaat van deze lieve babybanner cadeau-ideeën!

I wish you many creative moments today and see you soon!                       * Ik wens je veel creatieve momenten vandaag en tot snel!


I also received an Affiliate Link. This means that PCC rewards me for orders that you place on their website. It costs you nothing extra, but it does give me a nice advantage. You help me a lot if you place an order true this link: www.printablecuttablecreatables.com/?pcc=11. In return I have a nice discount code for you: 'craftyellen15'. This gives you a 15% discount during the entire design team period!                       * Ik heb ook een affiliate-link ontvangen. Dit betekent dat PCC mij beloont voor bestellingen die u op hun website plaatst. Het kost jou niets extra, maar levert mij wel een mooi voordeel op. Je helpt mij enorm als je een bestelling plaatst via deze link: www.printablecuttablecreatables.com/?pcc=11. Als tegenprestatie heb ik een leuke kortingscode voor je: 'craftyellen15'. Hiermee krijg je gedurende de gehele ontwerpteamperiode 15% korting!

vrijdag 26 januari 2024

Valentine's Card mad with Christmas Products


I want to inform you that I have a cute Valentine's card, made with some Christmas products. You can see more on Newton's Nook Designs Blog.                        * Ik wil jullie even meededelen dat ik vandaag een leuke Valentijnskaart heb gemaakt met kerstproducten. Je kunt meer zien op Newton's Nook Designs Blog.

zondag 12 november 2023

Woodland Fall Decor

 
Hello everyone!! Printable Cuttable Creatables has new fall SVG’s that have cute autumn images colored in as well as a separated file with only the outline of the illustrations. Here I’m using the ‘Sleeping Fox’, ‘Cute Sitting Fox’ and the ‘Cute Woodland Squirrel’ SVG Files.                        * Hallo iedereen!! Printable Cuttable Creatables heeft nieuwe herfst-SVG's met schattige herfstafbeeldingen ingekleurd, evenals een apart bestand met alleen de omtrek van de illustraties. Hier gebruik ik de ‘Sleeping Fox’, ‘Cute Sitting Fox’ en de ‘Cute Woodland Squirrel’ SVG-bestanden.

In Belgium a lot of people wait after December 6th to decorate for Christmas (on Dec. 6 Saint Nicolas is coming). So I wanted to create some fall ornaments.                        * In België wachten veel mensen tot na 6 december om alles te versieren voor Kerstmis (op 6 december komt Sinterklaas). Dus ik wilde wat herfstornamenten maken.


I bought these ornaments in a sort of dollar store. They were already filled with dried flowers. Of course you can easily create this yourself with clear ornaments as well.                        * Ik kocht deze kerstballen in de Action. Ze waren al gevuld met droogbloemen. Natuurlijk kun je dit ook gemakkelijk zelf maken met heldere ornamenten.

I simply added the cute critters on top (they were cut out on copper vinyl). Isn’t it adorable? I love it and hope you try this out!                         * Ik heb er eenvoudigweg de schattige beestjes bovenop geplakt (ze zijn uitgesneden op kopervinyl). Is het niet schattig? Ik vind het geweldig en hoop dat je dit uitprobeert!

  
I also received an Affiliate Link. This means that PCC rewards me for orders that you place on their website. It costs you nothing extra, but it does give me a nice advantage. You help me a lot if you place an order true this link: www.printablecuttablecreatables.com/?pcc=11. In return I have a nice discount code for you: 'craftyellen15'. This gives you a 15% discount during the entire design team period!                       * Ik heb ook een affiliate-link ontvangen. Dit betekent dat PCC mij beloont voor bestellingen die u op hun website plaatst. Het kost jou niets extra, maar levert mij wel een mooi voordeel op. Je helpt mij enorm als je een bestelling plaatst via deze link: www.printablecuttablecreatables.com/?pcc=11. Als tegenprestatie heb ik een leuke kortingscode voor je: 'craftyellen15'. Hiermee krijg je gedurende de gehele ontwerpteamperiode 15% korting!

vrijdag 10 november 2023

How to Make a Pretty and Easy Christmas Card


I’m back with with a holiday card idea made with a new product from Newton's Nook Designs.                        * Ik ben terug met een kerstkaartidee gemaakt met een nieuw product van Newton's Nook Designs.
 

This is a rather simple card. Basically I layered different colors of paper and added the stamp set on top. The stamp set is colored with the 'Zig Clean Color Real Brush Markers'. Some elements are taped with foam tape others not.                        * Dit is een vrij eenvoudige kaart. Eigenlijk heb ik verschillende kleuren papier over elkaar heen gelegd en de stempel set erbovenop aangebracht. De stempel set is gekleurd met de 'Zig Clean Color Real Brush Markers'. Sommige elementen zijn op elkaar gelijmd met foamtape, andere niet.


woensdag 1 november 2023

Cute Flock and Foil Mug Cards


Hello all! Here I am again. Today I have a post ready on the ThermOWeb blog too. So if you want more inspiration, be sure to check out the additional blog post!                        * Hallo allemaal! Hier ben ik weer. Ook vandaag heb ik een post klaar op de ThermOWeb blog. Dus als je nog meer inspiratie wil, bekijk dan zeker de extra blog post!

donderdag 26 oktober 2023

Cute Flock and Foil Bird Cards


Hi there, I'm poppin in to tell you that I have a blog post ready for you today on the ThermOWeb blog. See you there!                        * Hey hey, ik verschijn even op mijn blog om je te vertellen dat ik een blogpost voor je klaar heb staan ​​op de ThermOWeb-blog vandaag. Tot daar!

donderdag 28 september 2023

Fun DIY Fall Home Decor Ideas

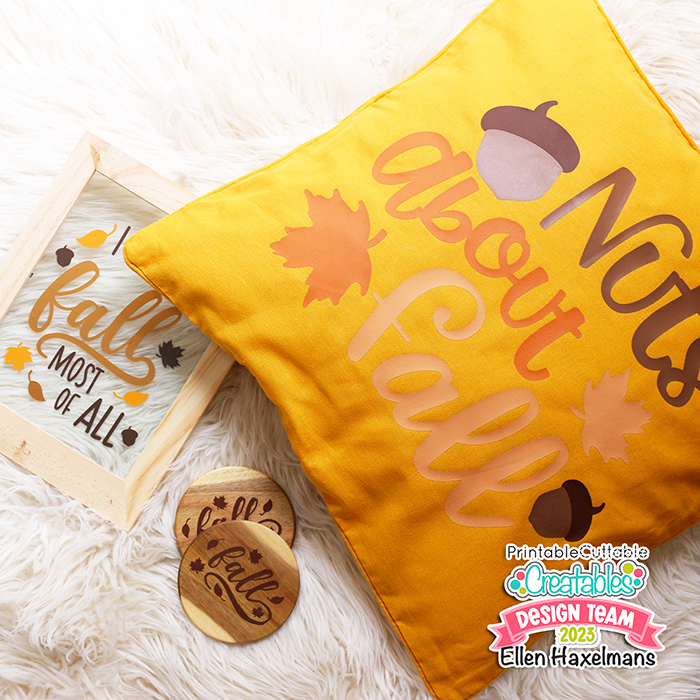
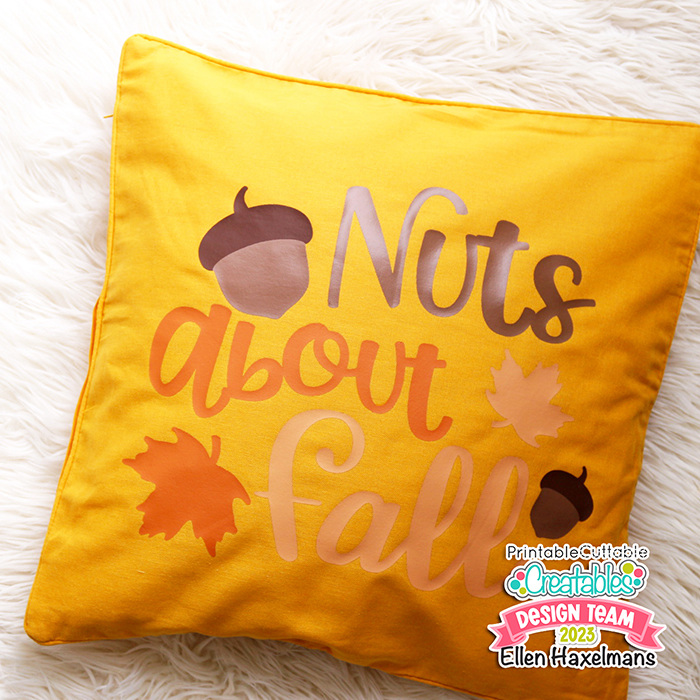
Hello everyone!! I'm here again with some super fun fall home decore idea’s. Printable Cuttable Creatables has pretty fall SVG’s that can be used on their own, but also make a pretty ensemble! On this post I’m using the “Nuts About Fall”, “I Love Fall Most of All” and the (free) “Fall” SVG Files.                        * Dag iedereen!! Ik ben hier weer met een aantal superleuke herfstdecoratie-ideeën.
Printable Cuttable Creatables heeft mooie herfst-SVG's die op zichzelf kunnen worden gebruikt, maar ook een mooi ensemble kunnen vormen! Voor dit bericht gebruik ik de “Nuts About Fall”, “I Love Fall Most of All” en de (gratis) “Fall” SVG-bestanden.
This mustard pillowcase was screaming for some fall decoration. To make this you need Heat Transfer Vinyl (I’m using 4 different brown colors).                        * Dit mosterdkleurige kussensloop schreeuwde om wat herfstdecoratie. Om dit te maken heb je flex nodig (ik gebruik 4 verschillende bruine kleuren).


Decorating your own pillow cases is really budget friendly. Of course is super pretty next to a green or orange pillow.                        * Je eigen kussenslopen versieren is echt budgetvriendelijk. Staat natuurlijk super mooi naast een groen of oranje kussen.


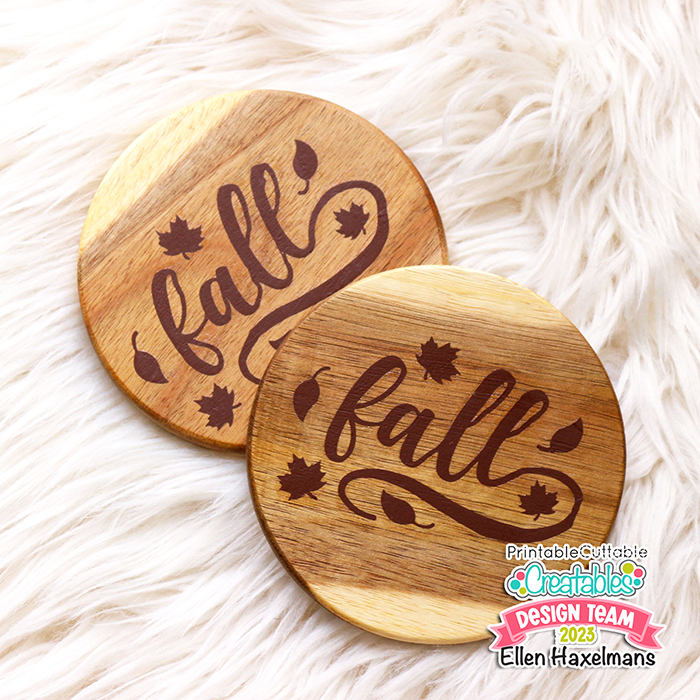
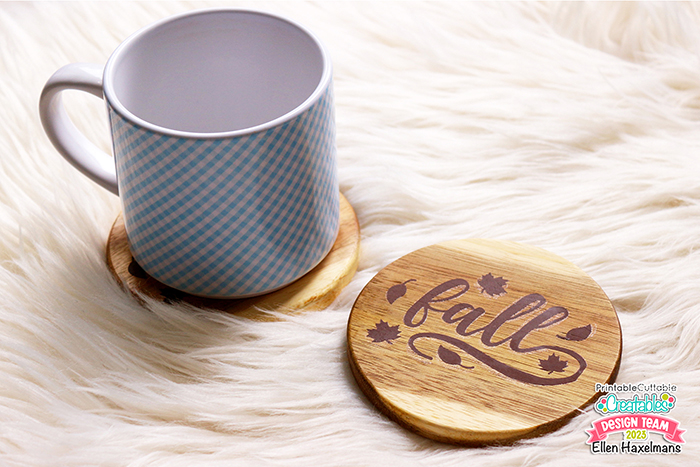
A smaller detail in home decor can be uplifting, for example some wooden coasters. These coaster where also very cheap (I bought them in a sort of dollar store).                        * Een kleiner detail in de woninginrichting kunnen enkele houten onderzetters zijn. Deze onderzetters waren ook erg goedkoop (ik kocht ze in een soort dollar store).


Just as I did with one of my bookmarks (I shared it recently, check it out) I used Heat Transfer Vinyl to decorate the coasters. They match my self-made mug perfectly (more information here).                         * Net zoals ik deed met een van mijn bladwijzers (ik heb hem onlangs gedeeld, meer info hier) heb ik Heat Transfer Vinyl gebruikt om de onderleggers te versieren. Ze passen perfect bij mijn zelfgemaakte mok (meer informatie hier). 


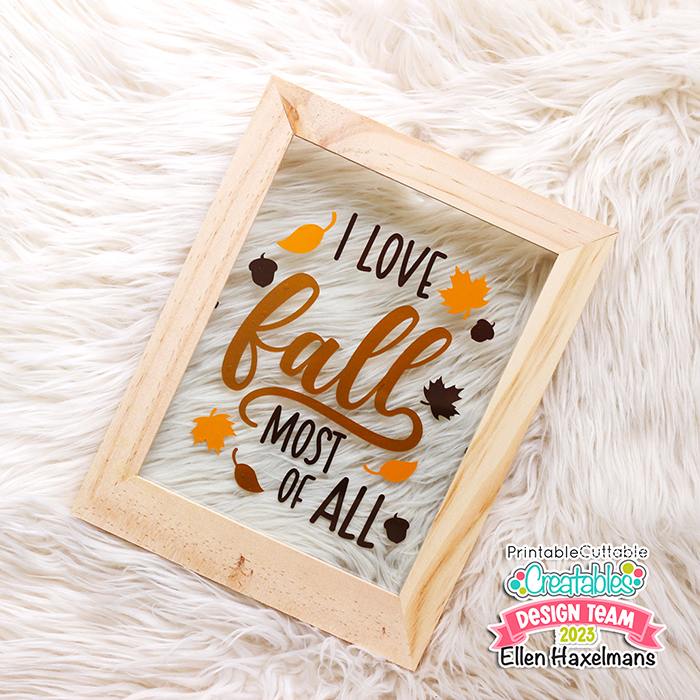
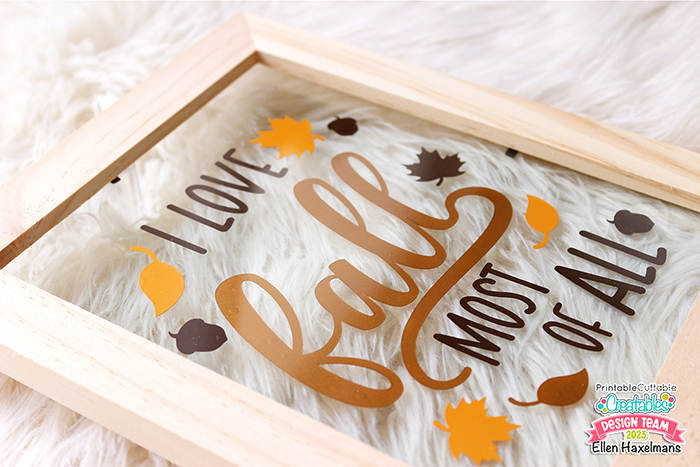
In the same dollar store I did buy some frames with 2 glass sides. I really love these frames to add regular vinyl. I did cut the “I Love Fall Most of All” files in 3 different colors (the word fall is even in a pretty bronze color).                        * In dezelfde dollarstore kocht ik een aantal lijsten met 2 glazen zijdes. Ik ben echt dol op deze frames om gewoon vinyl toe te voegen. Ik heb de “I Love Fall Most of All” bestanden in 3 verschillende kleuren geknipt (het woord herfst is zelfs in een mooie bronskleur).


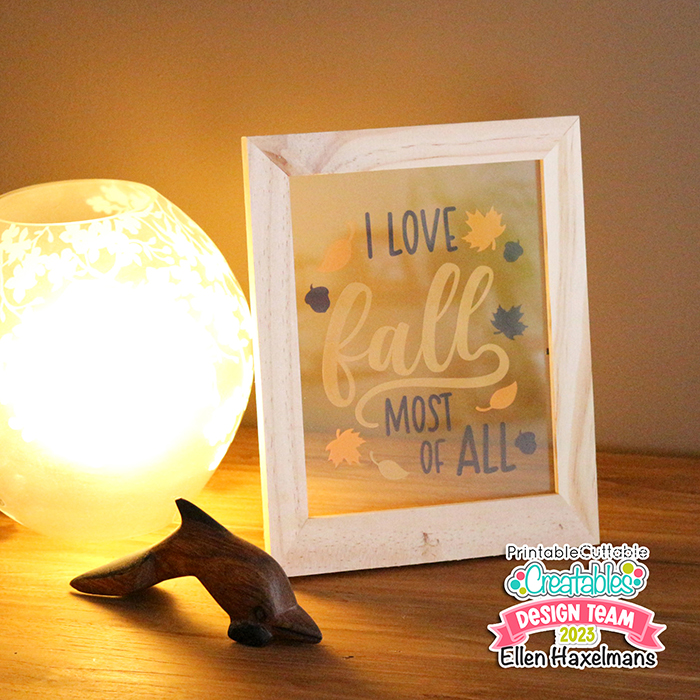
Quick tip; I place the glass without vinyl on top of the glass with vinyl. As a result, the vinyl layer is protected by the other glass. No dust or other dirt can get stuck between the vinyl and everything stays neatly during the cleaning the frame when needed.                        * Snelle tip; Het glas zonder vinyl plaats ik op het glas met vinyl. Hierdoor wordt de vinyllaag beschermd door het glas. Er kan geen stof of ander vuil tussen het vinyl blijven zitten en alles blijft netjes schoon tijdens het schoonmaken van het frame wanneer dat nodig is.


Now I’m ready to put on the candles and take out a blanket for a movie night in my cozy house!                        * Nu ben ik klaar om de kaarsen te doen branden en een dekentje tevoorschijn te halen voor een filmavondje in mijn gezellige huis!


I also received an Affiliate Link. This means that PCC rewards me for orders that you place on their website. It costs you nothing extra, but it does give me a nice advantage. You help me a lot if you place an order true this link: www.printablecuttablecreatables.com/?pcc=11. In return I have a nice discount code for you: 'craftyellen15'. This gives you a 15% discount during the entire design team period!                       * Ik heb ook een affiliate-link ontvangen. Dit betekent dat PCC mij beloont voor bestellingen die u op hun website plaatst. Het kost jou niets extra, maar levert mij wel een mooi voordeel op. Je helpt mij enorm als je een bestelling plaatst via deze link: www.printablecuttablecreatables.com/?pcc=11. Als tegenprestatie heb ik een leuke kortingscode voor je: 'craftyellen15'. Hiermee krijg je gedurende de gehele ontwerpteamperiode 15% korting!

dinsdag 12 september 2023

Two Ways to Make a Bookmark with a Cricut

Today I have a super fun blog post ready for you. I make two super adorable bookmarks. To make these I used the “Groovy Retro Flowers” and the “Happy Pencil” SVG Files from van Printable Cuttable Creatables.                        * Vandaag heb ik een superleuke blogpost voor jullie klaarstaan. Ik maak twee super schattige bladwijzers. Om deze te maken heb ik de “Groovy Retro Flowers” ​​en de “Happy Pencil” SVG-bestanden van Printable Cuttable Creatables gebruikt.


Let me show you how I made the first bookmark.                        * Ik zal je laten zien hoe ik de eerste bladwijzer heb gemaakt.

I did start out by creating a bookmark template. Measure your real live template and try to mimic it as much as you can. Next you make pattern with the elements you want to use (here 2 flowers from the “Groovy Retro Flowers” ​​SVG Files). With the 'slice' tool from Cricut Design Space you can cut a shape from another shape. Using the slice tool will split two overlapping images into different parts. Each new shape will appear as an individual layer. Now you can delete the unwanted images.                        * Ik begon met het maken van een bladwijzersjabloon. Meet uw echte live-sjabloon en probeer deze zoveel mogelijk na te bootsen. Vervolgens maak je een patroon met de elementen die je wil gebruiken (hier 2 bloemen uit de “Groovy Retro Flowers” ​​SVG-bestanden).
Met de 'slice' tool van Cricut Design Space kun je een vorm uit een andere vorm knippen. Als je het gereedschap 'opsplitsen' gebruikt, worden twee overlappende afbeeldingen in verschillende delen gesplitst. Elke nieuwe vorm verschijnt als een individuele laag. Nu kan je de ongewenste afbeeldingen verwijderen.

For my first bookmark I did use a clear acrylic bookmark. For that reason I did cut out all images out of vinyl. I used my example (made in Cricut Design Space) as a reference to place all the flowers while finishing the bookmark.                        * Voor mijn eerste boekenlegger heb ik een doorzichtige acryl boekenlegger gebruikt. Om die reden seed ik alle afbeeldingen uit vinyl. Ik heb mijn voorbeeld (dat was gemaakt in Cricut Design Space) gebruikt als referentie om alle bloemen te plaatsen terwijl ik de bladwijzer afwerkte.

I finished the bookmark off with a tassel and wooden bead. This is really so cute!!                        * Ik maakte de boeklegger af met een kwastje en een houten kraal. Dit is echt zo schattig!!

Of course I also wanted to show a second example…                        * Natuurlijk wilde ik ook nog een tweede voorbeeld laten zien…


For this bookmark I used the ‘combine’ tool from Cricut Design Space. This allows you to create new shapes. I used the ‘Unite’ button to merge the two yellow parts of the pencil shapes into one larger pencil (little note; the layers may change position). Next I did unite the eyes with the yellow layers so that it became one image. As last step I did add my name.                        Voor deze bladwijzer heb ik de 'combineren' tool van Cricut Design Space gebruikt. Hierdoor kun je nieuwe vormen creëren. Ik heb de knop 'Verenigen' gebruikt om de twee gele delen van de potloodvormen samen te voegen tot één groter potlood (kleine opmerking; de lagen kunnen van positie veranderen). Vervolgens heb ik de ogen verenigd met de gele lagen zodat het één illustratie werd. Als laatste stap heb ik mijn naam toegevoegd.

Because I had a wooden bookmark for my second example, I used heat transfer vinyl. Heat Transfer Vinyl sticks much better on wood and provides a professional look.                        * Omdat ik voor mijn tweede voorbeeld een houten boekenlegger had, gebruikte ik flex. Heat Transfer Vinyl plakt veel beter op hout en zorgt voor een professionele uitstraling.

These happy colors really make my heart jumps up and down. It's great as a teacher gift or simply for your own.                        * Deze vrolijke kleuren laten mijn hart echt op en neer springen. Het is geweldig als cadeau voor een leraar of gewoon voor jezelf.

PS Want to see a third way to make bookmarks? Check out my sublimation bookmarks here: DIY Sublimation Bookmarks.                        * PS Wil je een derde manier zien om bladwijzers te maken? Bekijk hier mijn sublimatiebladwijzers: DIY Sublimation Bookmarks.


I also received an Affiliate Link. This means that PCC rewards me for orders that you place on their website. It costs you nothing extra, but it does give me a nice advantage. 
You help me a lot if you place an order true this link: www.printablecuttablecreatables.com/?pcc=11. In return I have a nice discount code for you: 'craftyellen15'. This gives you a 15% discount during the entire design team period!                       * Ik heb ook een affiliate-link ontvangen. Dit betekent dat PCC mij beloont voor bestellingen die u op hun website plaatst. Het kost jou niets extra, maar levert mij wel een mooi voordeel op. Je helpt mij enorm als je een bestelling plaatst via deze link: www.printablecuttablecreatables.com/?pcc=11. Als tegenprestatie heb ik een leuke kortingscode voor je: 'craftyellen15'. Hiermee krijg je gedurende de gehele ontwerpteamperiode 15% korting!