Posts tonen met het label Hello Card. Alle posts tonen

donderdag 5 augustus 2021

Picture shaker card

#newtonsnook #newtonsnookdesigns #handmadecard #cardmaking #stamping #babycard #picturecard #babydiyseries #nnd #card #cardmaking #handmade #stampset #dieset #paperart #hobby #drawing #copicmarkers #copicciao #copiccoloring #sneakypeek #newsletter #BalloonShakerDieset #essentialAlphabetdieset #LovelyLaundrystampset #FramesandFlagsdieset #FallingLeavesStencil.
ps. I covered up the baby’s face out of respect for the parents.                       * ps. Ik bedekte het gezicht van de baby uit respect voor de ouders.

Hello Everyone!! Today I have a card made for Newton's Nook Designs. I like to share with you how fun it is to use pictures on your card. Adding pictures really gives a personal touch to your cards. Did you know it’s super easy with the shaker dies from NND?                       * Dag iedereen!! Vandaag heb ik een kaart gemaakt voor Newton's Nook Designs. Ik deel graag met je hoe leuk het is om foto's op je kaart te gebruiken. Foto's voegen echt een persoonlijk tintje toe aan je kaarten. Wist je dat het super makkelijk is met de shaker dies van NND?

#newtonsnook #newtonsnookdesigns #handmadecard #cardmaking #stamping #babycard #picturecard #babydiyseries #nnd #card #cardmaking #handmade #stampset #dieset #paperart #hobby #drawing #copicmarkers #copicciao #copiccoloring #sneakypeek #newsletter #BalloonShakerDieset #essentialAlphabetdieset #LovelyLaundrystampset #FramesandFlagsdieset #FallingLeavesStencil.

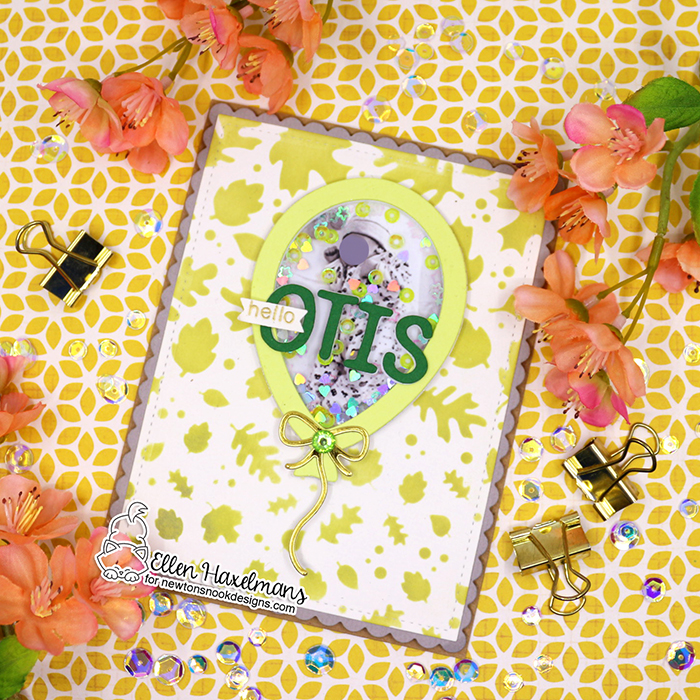
I printed out the picture with Word. If you use the ruler option in Word you can perfectly measure how big your picture will be printed. After printing, I did cut out all elements; the picture (balloon base die), adhesive foam (balloon frame die), transparency (balloon base die), and a colored frame (balloon frame die). First I sticked the foam on top of the picture and added sequins. Afterwards I attached the transparency and frame.                       * Ik heb de foto uitgeprint met Word. Als u de liniaaloptie in Word gebruikt, kan je perfect meten hoe groot je foto wordt afgedrukt. Na het printen heb ik alle elementen uitgesneden; de afbeelding (ballonbasismatrijs), zelfklevend foam (ballonframematrijs), transparant (ballonbasismatrijs) en een gekleurd frame (ballonframematrijs). Eerst plakte ik het foam op de foto en voegde ik pailletten toe. Daarna heb ik de transparant en het frame bevestigd.

#newtonsnook #newtonsnookdesigns #handmadecard #cardmaking #stamping #babycard #picturecard #babydiyseries #nnd #card #cardmaking #handmade #stampset #dieset #paperart #hobby #drawing #copicmarkers #copicciao #copiccoloring #sneakypeek #newsletter #BalloonShakerDieset #essentialAlphabetdieset #LovelyLaundrystampset #FramesandFlagsdieset #FallingLeavesStencil. 

Once balloon was completed, I added the name of the baby on top of the balloon. I also added a little banner with Hello.                       * Toen de ballon klaar was, voegde ik de naam van de baby bovenop de ballon. Ik heb ook een kleine banner toegevoegd met Hallo.
#newtonsnook #newtonsnookdesigns #handmadecard #cardmaking #stamping #babycard #picturecard #babydiyseries #nnd #card #cardmaking #handmade #stampset #dieset #paperart #hobby #drawing #copicmarkers #copicciao #copiccoloring #sneakypeek #newsletter #BalloonShakerDieset #essentialAlphabetdieset #LovelyLaundrystampset #FramesandFlagsdieset #FallingLeavesStencil.

The last step was to make a background. I simply used white paper and added leaves by using a stencil. By the way I used the parents birth card as inspiration. They had a lot of green colors and leaves on the announcement. I really love how elegant it looks with the picture. Besides that it’s super personal for the parents. I’m sure they will keep it.                       * De laatste stap was het maken van een achtergrondje. Ik gebruikte gewoon wit papier en voegde blaadjes toe met behulp van een stencil. Ik heb trouwens de geboortekaart van de ouders als inspiratie gebruikt. Ze hadden veel groene kleuren en bladeren op de aankondiging. De kaart is enorm elegant met de foto. Daarnaast is het super persoonlijk voor de ouders. Ik weet zeker dat ze het zullen bijhouden.


dinsdag 26 januari 2021

Baby DIY Series: Interactive Card

Hey everyone!! Today I have great news. As you can read in the title, I have a baby series ready. On a few moments during the year I will show baby cards, gifts, decorations, etc,... on my blog. In my circle of friends there are at least 4 babies on the way. This blog post shows already a card that I made for a child who was born in October last year. In the coming weeks I will shown a diaper cake and big sister gift.                      * Hey iedereen!! Vandaag heb ik leuk nieuws. Zoals je in de titel kan lezen, heb ik een baby serie klaar staan. Ik zal met periodes leuke baby kaartjes, cadeautjes, decoratie etc,.. tonen op mijn blog. In mijn vriendenkring zijn er zeker 4 baby'tjes op komst. Deze blog post, toont alvast een kaartje dat ik maakte voor een kindje dat vorig jaar in oktober al geboren is. In de volgende weken zullen jullie nog een pampertaart en een grote zussenpakje te zien krijgen.


I made an interactive card with the "Magic Iris" and "Magic Iris Camera Add-On" from Lawn Fawn. Then I decorate it with some sets from Hello Bluebird Design.                      * Ik maakte een interactief kaartje met de "Magic Iris" en "Magic Iris Camera Add-On" van Lawn Fawn. Vervolgens versierde ik het met enkele sets van Hello Bluebird Design.


I love how this card turned out! Hopefully you look forward to the rest of the series.                      * Ik vind het geweldig hoe dit kaartje eruit ziet! Hopelijk kijken jullie uit naar de rest van de serie.


maandag 17 augustus 2020

NND Release: August 2020 - Sips & Stories Stamps and dies + Mugs Stencils


Welcome to the August Release from Newton's Nook Design! The whole week their are blogposts with the design team to share the new products and inspiration.                     * Welkom bij de augustus release van Newton's Nook Design! De hele week zijn er blogposts van het ontwerpteam om de nieuwe producten en inspiratie te delen.


Let's dive right into the first stamp set called "Sips & Stories".                     * Laten we er in vliegen de eerste stempelset noemt "Sips & Stories".
I really like this stamp set! I work in a psychiatric center. In addition to guiding people to leisure/ finding a hobby for them,... we also have a library that helps us to communicate with many people. This set is therefore ideal for thanking volunteers.                     * Deze stempel set vind ik super fijn! Ik werk als vrijetijdsmedewerker in een psychiatrisch centrum. Buiten de personen toe te leiden naar de vrijetijd, hebben wij ook een bibliotheek die ons helpt om contact te hebben met vele personen. Deze set is dus ideaal om vrijwilligers te bedanken.


I made a slimline card perfect for a booklover/reader.                      * Ik heb een slimline kaart gemaakt die perfect is voor een boekenworm.


Next to that we also have the 'Mugs' stencil.                     Daarnaast hebben we ook de 'Mugs' stencil.


Of course I used the stencil on this card. I kept it simple by making a background with Distress ink. You can make even more elegant pieces by using glitter gel or foil!                      * Natuurlijk gebruikte ik het sjabloon op deze kaart. Ik hield het simpel door een achtergrond met Distress inkt van de te maken. Je kan natuurlijk nog elegantere werkjes met maken door het gebruik van glitter gel of foil!


The remaining illustrations from the stamp set 'Sip & Stories' were given a place on this card.                      * De overgebleven illustraties van de stempel set 'Sip & Stories' kregen een plaatsje op de kaart.


Would you like to win the “Sip & Stories”? We will choose ONE lucky winner for this stamp set! Here's how to win: Comment on the NND blog and Design Team blogs (see list below)! The winner will be chosen at random from the collective reveal posts. Make sure to check out each of their blogs and comment for your chance to win. You will not know which blog has been chosen so the more you comment on the better your chances are of winning! You have until Thursday August 20th at 9pm EST to comment  -- winners will be announced on the blog post on Friday, August 21st.                  * Wil je de "Sip & Stories" Stamp Set winnen? Voor deze set kiezen we ÉEN gelukkige winnaar! Je kan als volgt winnen: reageer op de NND blog en Design Team-blogs (zie onderstaande lijst)! De winnaar wordt willekeurig gekozen uit alle berichten die jullie schreven. Zorg ervoor dat je alle blogs bekijkt en een berichtje neerschrijft om een kans te hebben. Je weet niet welke blog is gekozen van deze hop, dus hoe meer je schrijft, hoe groter je kansen zijn om te winnen! Je hebt tot donderdag 20 augustus om 21:00 uur EST om een berichtje achter te laten - winnaars worden bekendgemaakt op de NND blogpost op vrijdag 21 augustus.

Check out all the awesome Design Team Blogs below to enter:                 Bekijk alle geweldige blogs van de designteamleden hieronder om deel te nemen:
Newton's Nook Design  |  Ellen (that's me)  |  Larissa  |  Samantha  |  Zsofia  |  Maria  |  Andrea  |  Tatiana  |   Amy  |  Amanda


woensdag 22 juli 2020

Happy Birthday You Old Goat

Sometimes you see a stamp set and an idea pops into your head. That's what happened here. When I got the new "Neigh" and "Bleat" stamp set, I did need to create something with all farm sets I own from Newton's Nook Designs! Last week I finally had the time to do that.                  Soms zie je een  stempel set en komt er meteen een idee in je op. Dat is wat hier is gebeurd. Toen ik de nieuwe stempelset "Neigh" en "Bleat" kreeg, moest ik iets maken met alle boerderijsets die ik bezit van Newton's Nook Designs! Vorige week had ik daar eindelijk de tijd voor.


Today I would like to show you how to make a cardbase yourself.                  Vandaag wil ik je graag tonen hoe je zelf ook een kaartbase maakt.

  • Step 1: Fold your cardstock in two.                  * Stap 1: Vouw je papier in tweeën.
  • Step 2: You cut out your panel with the same die you used for your cardfront. Pay attention you do not cut all the way up to your fold. This makes it possible to have a shaped card.                  * Stap 2: Snij je paneel uit met dezelfde snijmal die je gebruikte voor je kaartfront. Let op dat je niet helemaal tot aan je vouwlijn snijdt. Dit maakt het mogelijk om er een kaart in eender welke vorm te snijden.
  • Step 3: Glue your card frond on top of your folded card base. They match perfectly because you used the same die for it.                  Stap 3: Lijm je kaartfront bovenop je gevouwen kaart. Ze passen perfect bij elkaar omdat je er dezelfde dobbelsteen voor hebt gebruikt.


If I had more space I would have even added the pigs, chickens and tractors, but that might be for next time!                  Als ik meer plaats had zou ik er zelfs nog de varkentjes, kippen en de traktors erbij hebben gedaan, maar dat is misschien voor volgende keer!


If you’re looking to create a fun shaped card with your dies, this project might be something to try!                  Als je met je snijmallen een leuke kaart wilt maken, is dit project misschien iets om te proberen!


dinsdag 21 juli 2020

Woof It Up With Flock

Welcome back to the blog! Of course, I also want to participate in the ThermOWeb and Whimsy Stamps collaboration week. And while this is a little after our collaboration…there’s always time to be inspired! I’ve been on their design team and I even illustrated some stamps for them. So it’s time to make something fun!                  * Welkom terug op de blog! Natuurlijk wilde ik ook deelnemen aan de ThermOWeb en Whimsy Stamps samenwerkingsweek. Hoewel de samenwerking reeds passeerde... is er altijd tijd om geïnspireerd te raken! Ik zat in het design team en illustreerde zelfs een aantal stempels voor Whimsy Stamps. Het is dus tijd om iets leuks te maken!


You can do a lot with the flock; coloring with ink or stamp on it and apply it with Foam or Gel. If you want te see how you can use these products, be sure to check the ThermOWeb blog. You can find more details on their blog, even for this post!                  * Je kan veel doen met flock; geef het kleur met inkt of stempel erop en breng het aan met Foam of Gel aan. Als je wilt zien hoe je deze producten kunt gebruiken, bekijk dan de ThermOWeb-blog. Daar vind je veel meer gedetaileerde uitleg op hun blog, ook bij deze post!


When the card was finished, I started on the envelope.                    *  Toen de kaart klaar was, begon ik aan de envelop.


I’m so happy with this card, envelope and my new slimy friend.                    Ik ben zo blij met deze kaart, envelop en mijn nieuwe slijmerige vriend.