Posts tonen met het label step by step. Alle posts tonen

donderdag 16 mei 2024

A Trio of Christmas Cards


It’s never to early to start making Christmas cards. Today I started making my first cards for ThermOWeb. You can find the complete post on their blog.                       * Het is nooit te vroeg om te beginnen met het maken van kerstkaarten. Vandaag ben ik begonnen met het maken van mijn eerste kaarten vor ThermOWeb. Het volledige bericht vind je op hun blog.

donderdag 25 april 2024

Sweet Baby Banner Gift Idea


Hello and welcome to my blog again. Today I'm sharing this sweet baby banner gift I made using the: “Pretty Birdhouse SVG”,  “Mama & Baby Bird in Nest SVG”, “Sweet Baby Safety Pins SVG” and the hearts from “Cloud Raining Hearts SVG” from the PCC Shop.                       * Hallo en opnieuw welkom op mijn blog. Vandaag deel ik dit lieve babybannercadeautje dat ik heb gemaakt met de: "Pretty Birdhouse SVG", "Mama & Baby Bird in Nest SVG", "Sweet Baby Safety Pins SVG" en de hartjes uit "Cloud Raining Hearts SVG" van de PCC-winkel.


First of all I made my garland with HTV and my cutting machine. I combined the flowers of the birdhouses with the text and added a little heart here and there.                       * Allereerst heb ik mijn slinger gemaakt met flex en mijn snijmachine. De bloemen van de vogelhuisjes heb ik gecombineerd met de tekst en hier en daar een hartje toegevoegd.


Because there was also a bird on the baby card of Mia, these could of course not be missed on my flags. The eyes are the core of the flowers (cut out in a black color). My drawing was too fine to cut out the eyes as originally intended.                       * Omdat er op de babykaart van Mia ook een vogel stond, konden deze uiteraard niet ontbreken op mijn vlaggetjes. De ogen vormen de kern van de bloemen (uitgesneden in een zwarte kleur). Mijn tekening was te fijn om de ogen uit te snijden zoals oorspronkelijk bedoeld.


Do you know Canva? It is a website with which you can create professional posters, documents, Instagram posts and much more. PCC also provides png photos in the SVG sets. Ideal for making beautiful cards to add to your projects for sure with the help of this website.                       * Ken jij Canva? Het is een website waarmee je professionele posters, documenten, Instagram-posts en nog veel meer kunt maken. PCC biedt ook png-foto's in de SVG-sets. Ideaal om mooie kaarten te maken die je zeker aan je projecten kunt toevoegen met behulp van deze website.


I also made a note with washing instructions and ideas for what you can use the banner for. You can’t read it because it is of course in Dutch (my native language). But this project shows that you can also use the pretty PCC illustrations for much more than you think at first glance!                       * Ook heb ik een briefje gemaakt met wasinstructies en ideeën waar je de banner voor kunt gebruiken. Dit project laat zien dat je de mooie PCC-illustraties ook voor veel meer kunt gebruiken dan je op het eerste gezicht denkt!


Hopefully you find this blog post super inspiring. I am really happy with the result of this sweet baby banner gift ideas!                       * Hopelijk vind je deze blogpost super inspirerend. Ik ben erg blij met het resultaat van deze lieve babybanner cadeau-ideeën!

I wish you many creative moments today and see you soon!                       * Ik wens je veel creatieve momenten vandaag en tot snel!


I also received an Affiliate Link. This means that PCC rewards me for orders that you place on their website. It costs you nothing extra, but it does give me a nice advantage. You help me a lot if you place an order true this link: www.printablecuttablecreatables.com/?pcc=11. In return I have a nice discount code for you: 'craftyellen15'. This gives you a 15% discount during the entire design team period!                       * Ik heb ook een affiliate-link ontvangen. Dit betekent dat PCC mij beloont voor bestellingen die u op hun website plaatst. Het kost jou niets extra, maar levert mij wel een mooi voordeel op. Je helpt mij enorm als je een bestelling plaatst via deze link: www.printablecuttablecreatables.com/?pcc=11. Als tegenprestatie heb ik een leuke kortingscode voor je: 'craftyellen15'. Hiermee krijg je gedurende de gehele ontwerpteamperiode 15% korting!

dinsdag 16 april 2024

Celebrating with Foil and Plush Papers

Hello today I have more inspiration! I made a nice birthday ensemble for Thermoweb with a bag, a card and a money bag. Are you curious? Go to the ThermOWeb blog.                       * Hallo vandaag heb ik nog meer inspiratie! Voor Thermoweb maakte ik een leuk verjaardagsensemble met een zakje, een kaarje en een geldbuideltje. Ben je benieuwd. Ga dan snel naaar de ThermOWeb blog.

maandag 26 februari 2024

What is Vinyl and a Cute Pencil Case as Example


Hello ‘PCC’ fans. Do you remember my Iron-On Viny blog post? Well today we're turning a spotlight on Vinyl.                        * Hallo ‘PCC’-fans. Herinner je mijn Iron-On Viny-blogpost nog? Vandaag zetten we Vinyl in de spotlight.

The example you see here in this blog post is a cute pencil case made with the ‘You Make Me Whole’ SVG File.                         * Het voorbeeld dat je hier in deze blogpost ziet, is een schattig etui gemaakt met het ‘You Make Me Whole’ SVG-bestand.


Simply put, vinyl is sticker paper. It’s perfect for creating permanent or easily removable labels/designs to create gifts (clipboards, notebooks, buckets, gift bags), home décor, or anything you can think of. Find some Easter ideas/examples by clicking here.                        * Simpel gezegd is vinyl een soort stickerpapier. Het is perfect om permanente of gemakkelijk verwijderbare labels/ontwerpente maken voor cadeaus (klemborden, notitieboekjes, emmers, cadeauzakjes), decoratie of wat je ook maar kan bedenken. Enkele paasideeën/voorbeelden vind je hier door te klikken.

There are different types of vinyl, for example:                        * Er zijn verschillende soorten vinyl, bijvoorbeeld:
  • Permanent Vinyl;
  • Removable Vinyl;
  • Smart Vinyl (you can cut it without a mat on a Cricut Maker 3/Explore 3 machine) / (je kunt het zonder mat snijden met een Cricut Maker 3/Explore 3-machine.)
    Bedrukbaar vinyl (perfect voor het maken van stickers) / (perfect voor het maken van stickers)
  • Printable Vinyl (Perfect for making stickers);
  • Stencil Vinyl (ideal to use for painting or etching) / (ideaal om te gebruiken voor schilderen of etsen);
  • Chalkboard Vinyl;
  • Special Vinyl (for example, glitter, holographic, UV or heat sensitive (changing color), glow in the dark, transparent, frosted) / (bijvoorbeeld glitter, holografisch, UV- of warmtegevoelig (veranderende kleur), glow in the dark, transparant, mat)

How does it work? First, you cut out all the pieces you need and weed out all excess vinyl. Next, apply your vinyl to a piece of clear transfer tape. Carefully remove the vinyl by adding it to the transfer tape (the sticky side of the vinyl must be exposed). Apply all layers, starting with the top layer first, and line them up.                        * Hoe werkt het? Eerst knip je alle stukken uit die je nodig hebt en verwijder je al het overtollige vinyl. Breng vervolgens je vinyl aan op een stuk doorzichtige transfertape. Verwijder het vinyl voorzichtig door het aan de transfertape toe te voegen (de plakkerige kant van het vinyl moet zichtbaar zijn). Breng alle lagen aan, begin eerst met de bovenste laag, en lijn ze uit.

Carefully remove the transfer tape by using a scraper. The vinyl will stick to your surface perfectly now. (check out the step-by-step tutorial by clicking here).                        * Verwijder de transfertape voorzichtig met een schraper. Het vinyl blijft nu perfect aan je oppervlak plakken. (bekijk de stap-voor-stap handleiding door hier te klikken).

The possibilities are endless! You can personalize just about anything with a little bit of vinyl. What will be your next project?                        * De mogelijkheden zijn eindeloos! Met een beetje vinyl kun je vrijwel alles personaliseren. Wat wordt je volgende project?


I also received an Affiliate Link. This means that PCC rewards me for orders that you place on their website. It costs you nothing extra, but it does give me a nice advantage. You help me a lot if you place an order true this link: www.printablecuttablecreatables.com/?pcc=11. In return I have a nice discount code for you: 'craftyellen15'. This gives you a 15% discount during the entire design team period!                       * Ik heb ook een affiliate-link ontvangen. Dit betekent dat PCC mij beloont voor bestellingen die u op hun website plaatst. Het kost jou niets extra, maar levert mij wel een mooi voordeel op. Je helpt mij enorm als je een bestelling plaatst via deze link: www.printablecuttablecreatables.com/?pcc=11. Als tegenprestatie heb ik een leuke kortingscode voor je: 'craftyellen15'. Hiermee krijg je gedurende de gehele ontwerpteamperiode 15% korting!

woensdag 13 december 2023

Fancy Foils and Flock Holiday Cards


Hello all! Here I am again. Today I have a post ready on the ThermOWeb blog too. So if you want more inspiration, be sure to check out the additional blog post!                        * Hallo allemaal! Hier ben ik weer. Ook vandaag heb ik een post klaar op de ThermOWeb blog. Dus als je nog meer inspiratie wil, bekijk dan zeker de extra blog post!

woensdag 1 november 2023

Cute Flock and Foil Mug Cards


Hello all! Here I am again. Today I have a post ready on the ThermOWeb blog too. So if you want more inspiration, be sure to check out the additional blog post!                        * Hallo allemaal! Hier ben ik weer. Ook vandaag heb ik een post klaar op de ThermOWeb blog. Dus als je nog meer inspiratie wil, bekijk dan zeker de extra blog post!

woensdag 20 september 2023

3 ways to use Deco Foil Transfer Sheets


I'm popping in to let you know I have a card and tag on the ThermOWeb blog showcasing 3 different ways to add Deco Foil Transfer sheets onto your cards.                        * Ik kom hier even piepen om je te laten weten dat ik een kaart en tag op de ThermOWeb-blog heb met 3 verschillende manieren om Deco Foil Transfer-vellen op je kaarten aan te brengen.

vrijdag 8 september 2023

Cute Get Well card and Embroidery Hoop


Hey hey!! I'm over the moon with this card and cute embroidery hoop you can use as home decor. You can see all details and a tutorial on the ThermOWeb blog, I hope to see you there!                        * Hoi hoi!! Ik ben in de wolken met deze kaart en schattige borduurring die je als decoratie kan gebruikt worden. Je kunt alle details en een tutorial bekijken op de ThermOWeb blog, ik hoop je daar te zien!

vrijdag 25 augustus 2023

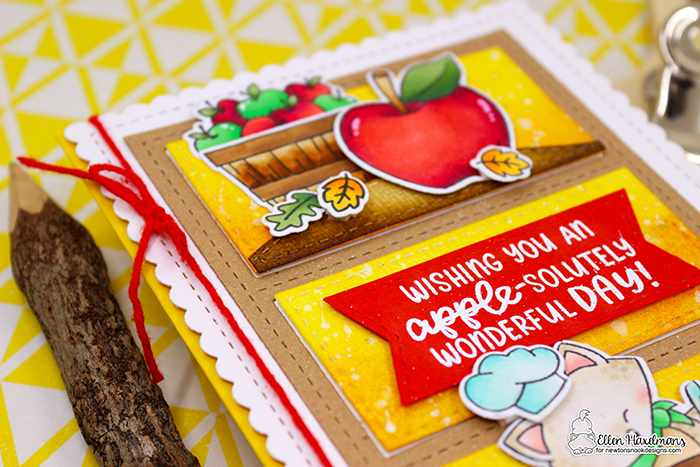
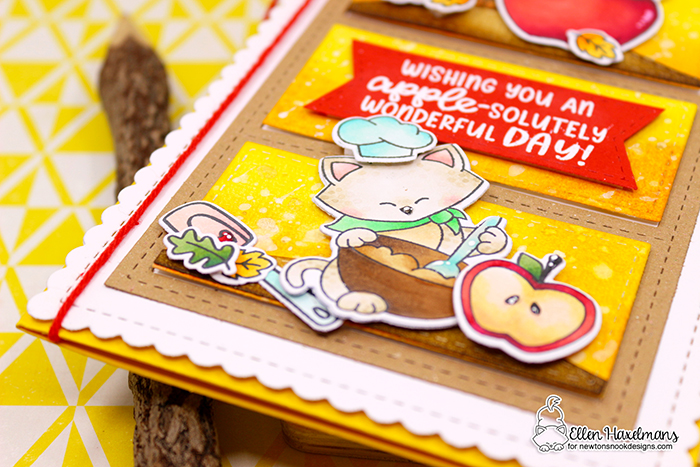
Autumn Apple Card


Happy Friday!! Today I have a blog post for Newton's Nook Designs.                        * Fijne vrijdag!! Vandaag heb ik een blog post voor Newton's Nook Designs.


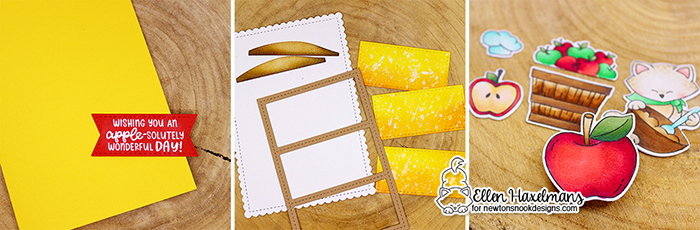
  1. I stated by cutting the card base, folding it and stamped the sentiment with white embossing powder (using a heat tool and versamark ink).                        * 1. Ik begon met het snijden van de kaartbasis en deze te vouwen en de tekst te stempelen met wit embossingpoeder (met behulp van een heattool en versamark-inkt).

  2. Next I did cut a few elements from the A7 Frames and banners. The inside rectangles I did cut twice. Once I did collared the first batch in a yellow orange. From the second batch hills.                        * 2. Vervolgens heb ik een aantal elementen met de A7 Frames en banners gesneden. De binnenste rechthoeken heb ik twee keer uitgesneden. De eerste rechthoeken heb ik in geeloranje verkleurt. De tweede gesneden rechthoeken kleurde ik bruin en sneed ik er heuvels uit.

  3. Next I did color all the illustration with my copic markers.                        * 3. Vervolgens heb ik de hele illustratie ingekleurd met mijn copic markers.
Red/Rood: R89, r39, R29, R27, R24
Light green/Licht groen: YG67, YG63, G29, 
Green/Groen: G09, G07, G05, G03, G02
Brown/Bruin: E37, E35, E33, E31
Dark brown/Donker bruin: E79,E47, E57
Blue/Blauw: BG13, BG11, BG10
White/Wit: E43, E41, E40
Pink/Roze: R21, R00
Yellow/Geel: YR16, Y38, Y35


I had so much fun using new ones with old stamps.                        * Ik had zoveel plezier om nieuwe met oude stempels te gebruiken.


 Be sure to check out the NND blog for more inspiration.                        * Bekijk zeker de NND blog voor meer inspiratie.


vrijdag 28 juli 2023

Hot Foil ShakerCocktail Card


Happy Friday!! I'm just passing by to tell you I have a blog post with tutorial on the Newton's Nook Designs blog to make you feel ready for summer. See you there!                        * Het is vrijdag!! Ik kom even langs om je te vertellen dat ik een blogpost met tutorial heb op de Newton's Nook Designs-blog om je klaar te stomen voor de zomer. Zie je daar!

woensdag 5 juli 2023

Hot Foil and Flock cards

There are some gorgeous foiled cards waiting for you on the ThermOWeb blog. Be sure to check it out!                        * Er wachten een aantal blinkende kaarten op je op de ThermOWeb-blog. Bekijk ze zeker ook eens!

donderdag 6 april 2023

The Cutest Spring Cards


Hello everyone, today I pass by to say that you should definitely keep an eye on my Instagram page and the ThermOWeb blog, because I have super colorful cards ready.                       * Hallo iedereen, vandaag passeer ik even om te melden dat jullie zeker mijn Instagram pagina en de ThermOWeb blog in de gaten moeten houden, want ik heb super fleurige kaartjes klaarstaan.

woensdag 15 maart 2023

Sublimation Easter Mugs and Coasters

Hi Printable Cuttable Creatables fans! I am back with some fun Easter-inspired sublimation projects.                        * Hallo fans van Printable Cuttable Creatables! Ik ben terug met een aantal leuke op Pasen geïnspireerde sublimatieprojecten.


The first project I created were these cute mugs; I used one pattern paper from each set mentioned above.                        * Het eerste project dat ik maakte waren deze schattige mokken; Ik heb telkens één patroonpapier uit de hierboven genoemde sets gebruikt.

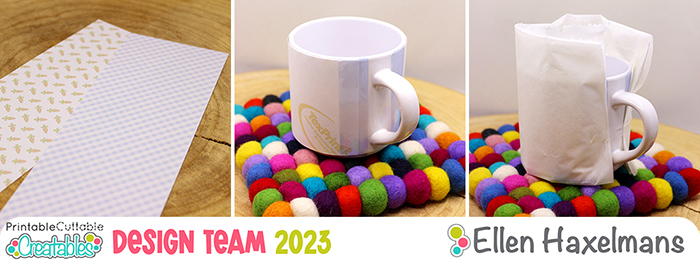
1. First I did print and cut out the mug design. When you want to sublimate it’s important you use a sublimation printer. Sublimation can be transferred by using heat on different materials that have a specific coat. It gives a sustainable and professional quality on you handmade items. I added the digital papers to a “Word” document and printed them out (it’s normal that the images looks faded/light).                        * 1. Eerst heb ik het ontwerp van de mok uitgeprint en uitgesneden. Wanneer je wilt sublimeren is het belangrijk dat je een sublimatieprinter gebruikt. Sublimatie kan worden overgebracht door warmte te gebruiken op verschillende materialen die een speciale laag hebben. Het geeft een duurzame en professionele kwaliteit aan je handgemaakte items. Ik heb de digitale papieren in een "Word"-document toegevoegd en uitgeprint (het is normaal dat de afbeeldingen er vaal/licht uitzien).

2. Later on I did cut the papers in the correct size for the mugs. With some heat resistant tape I did attach the paper to the mugs.                        * 2. Later heb ik de papieren op maat gesneden voor de mokken. Met wat hittebestendig tape heb ik het papier op de mokken geplakt.

3. Next I did apply some baking paper to protect my mug press. I followed the guide of my mug press and created to super cute mugs.                        * 3. Vervolgens heb ik wat bakpapier aangebracht om mijn mokkenpers te beschermen. Ik volgde de handleiding van mijn mokkenpers en creëerde superleuke mokken.
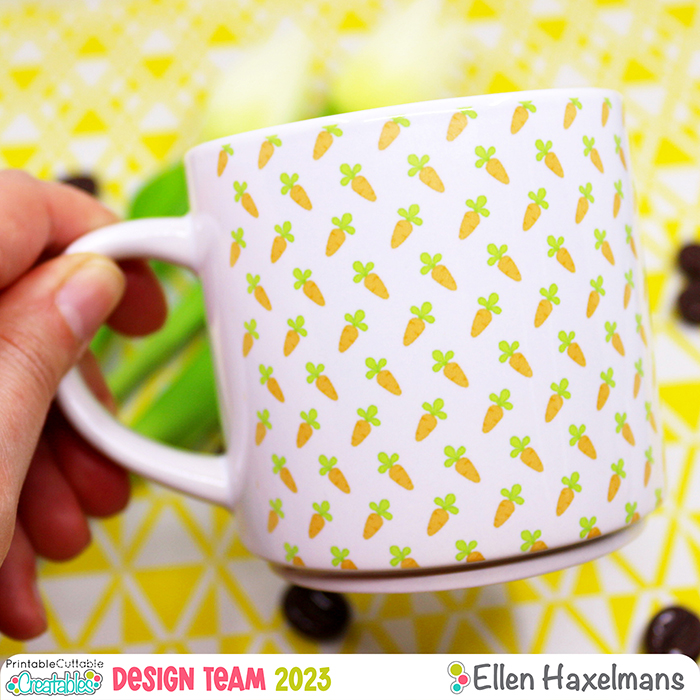

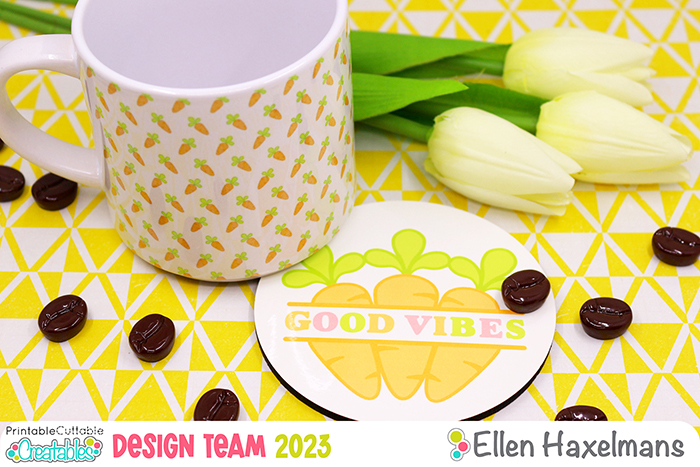
Here you can see the adorable Spring Carrots Pattern on the mug. In this post I choose patterns that are perfect for an Easter breakfast, but that are not too specific for Easter too. In my opinion it’s nice to use the mugs and coasters throughout the spring and not only for just one day.                        * Hier zie je het schattige Spring Carrots-patroon op de mok. In deze post kies ik patronen die perfect zijn voor een paasontbijt, maar die ook niet te specifiek zijn voor Pasen. Naar mijn mening is het leuk om de mokken en onderzetters het hele voorjaar te gebruiken en niet alleen voor één dag.


On the second mug I used the blue colored Spring Diamond Gingham Digital Paper.                         * Op de tweede mok heb ik het blauwe Spring Diamond Gingham Digital Paper gebruikt.


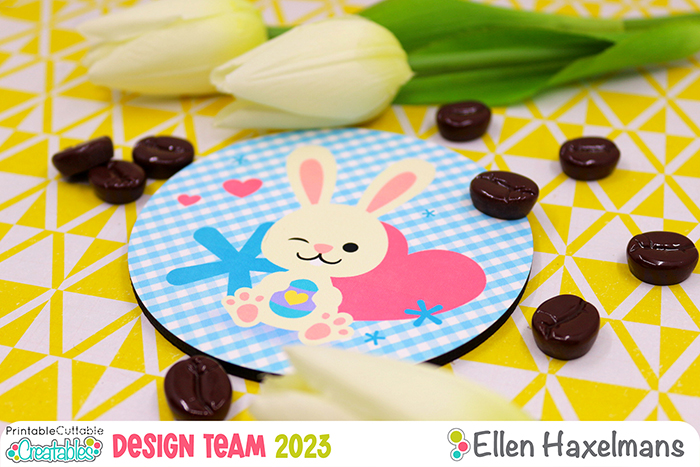
As you can see on the pictures I did make some coasters too!!                        * Zoals je op de foto's kan zien, heb ik ook onderzetters gemaakt!!
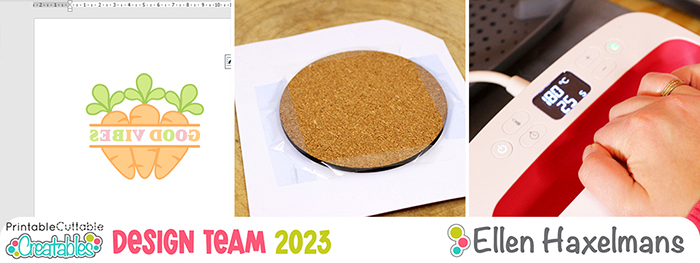

1. For the coasters I didn’t use a fancy program, I simply used “Word” to create two squares of the size of the coasters and printed it with the sublimation printer (remember to print out your designs in mirror!).                        * 1. Voor de onderzetters heb ik geen fancy programma gebruikt, ik heb gewoon "Word" gebruikt om twee vierkanten van de grootte van de onderzetters te maken en deze met de sublimatieprinter te printen (vergeet niet om je ontwerpen in spiegelbeeld af te drukken!).

2. With some heat resistant tape I did attach the paper to coasters. Next I did cover the coaster with some baking paper.                        * 2. Met de hittebestendig tape heb ik het papier op onderzetters geplakt. Vervolgens stak ik de onderzetter tussen bakpapier.

3. Turn the coasters with the paper site up to transfer the design with the Cricut EasyPress. Press settings: 180°C or 356 °Fahrenheit pressing for 60 sec.                        * 3. Draai de onderzetters met de ongedrukte zijde naar boven om het ontwerp over te brengen met de Cricut EasyPress. Persinstellingen: 180°C of 356 °Fahrenheit persen gedurende 60 sec.
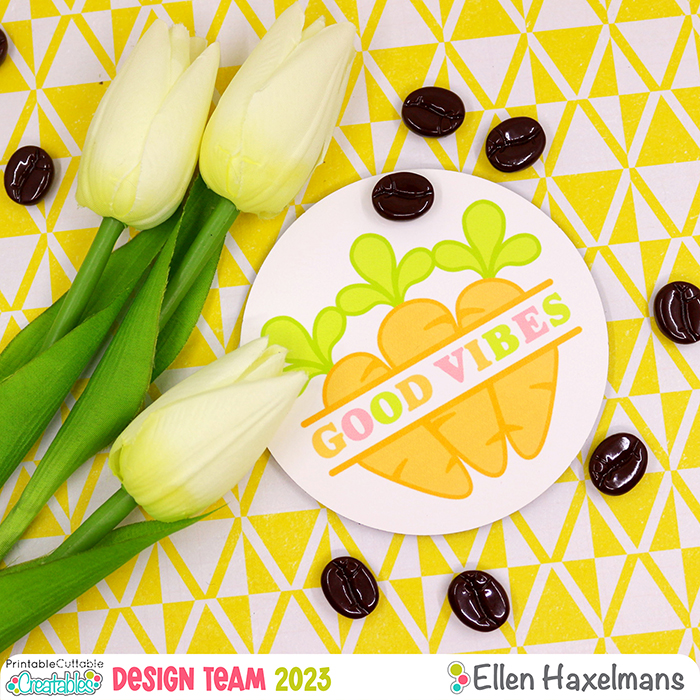

This coaster was simple to make. I used the Spring Carrots Split Frame Monogram SVG File. Next I did wrote “Good vibes” in the frame and gave it different colors.
                        * Deze onderzetter was eenvoudig te maken. Ik heb het Spring Carrots Split Frame Monogram SVG-bestand gebruikt. Vervolgens heb ik "Good Vibes" in word geschreven en deze verschillende kleuren gegeven.
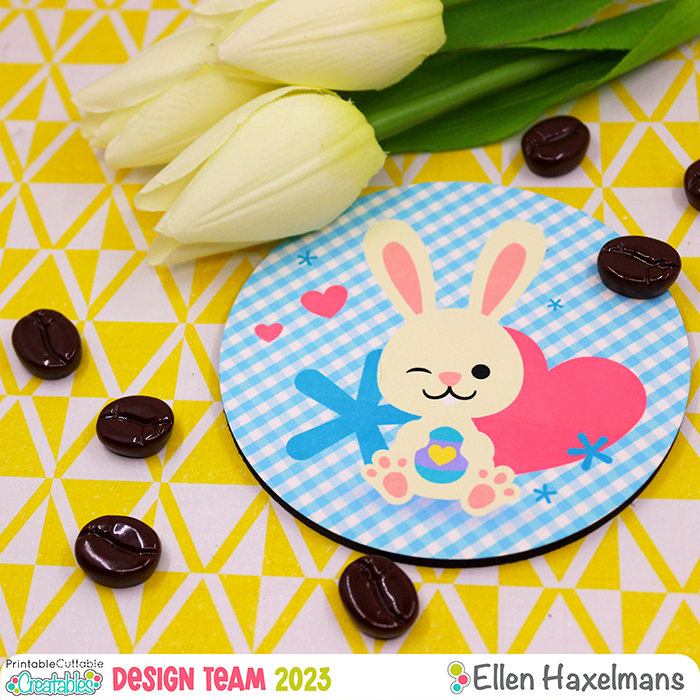

On this coaster I used different elements. I started with the blue colored Spring Diamond Gingham Digital Paper for the background. I did apply one of the bunny’s from the Bunny Squad SVG File in the middle. On the background you can see the hearts from the Pizza My Heart Free SVG File and the star shaped sprinkles from the Birthday Party Hats Free SVG Cut Files.                        * Op deze onderzetter heb ik verschillende elementen gebruikt. Ik ben begonnen met de blauw gekleurde Spring Diamond Gingham Digital Paper voor de achtergrond. Ik heb een van de konijntjes uit de Bunny Squad SVG File in het midden aangebracht. Op de achtergrond zie je de harten van het Pizza My Heart Free SVG File en de stervormige confetti van de Birthday Party Hats Free SVG Cut Files.

Sublimation is a real game-changers. It’s so much fun to create these professional looking and cute projects with the svg files from PCC!                        * Sublimatie is een echte game changer. Het is zo leuk om deze professioneel ogende en schattige projecten te maken met de svg-bestanden van PCC!


I also received an Affiliate Link. This means that PCC rewards me for orders that you place on their website. It costs you nothing extra, but it does give me a nice advantage. You help me a lot if you place an order true this link: www.printablecuttablecreatables.com/?pcc=11. In return I have a nice discount code for you: 'craftyellen15'. This gives you a 15% discount during the entire design team period!                       * Ik heb ook een affiliate-link ontvangen. Dit betekent dat PCC mij beloont voor bestellingen die u op hun website plaatst. Het kost jou niets extra, maar levert mij wel een mooi voordeel op. Je helpt mij enorm als je een bestelling plaatst via deze link: www.printablecuttablecreatables.com/?pcc=11. Als tegenprestatie heb ik een leuke kortingscode voor je: 'craftyellen15'. Hiermee krijg je gedurende de gehele ontwerpteamperiode 15% korting!